Copernicus
Copernicus is a tool that can be used used during IoT classes. It enables possibility to conduct several scenario driven classes focused on the software side of IoT. From our experience, in typical IoT projects 70% of time is consumed on dealing with hardware peripherals connected to the controller board of the device. During the remaining 30% of time, its significant amount is spent on software controlling hardware, while the application logic is oversimplified.
Current IoT systems are complex, logic is moved from the cloud to fog enabling necessity for the devices to interact between themselves. It is hardly possible to design and implement such interactions in the remaining 30% of time, especially during student classes. Because of that we have defined following list of functional requirements for the Copernicus board:
- dealing with hardware during the classes should be minimized in time but the device capabilities should not be primitive
- Copernicus should be Arduino compatible board enabling possibility to conduct scenario driven IoT classes
- all the hardware parts of the Copernicus board should be ready to use at the beginning of the lab (e.g. it should be possible to define min and max servo position)
- it should be quite simple to use the peripherals from virtually any programming language available on the Intel Galileo
How does it work?
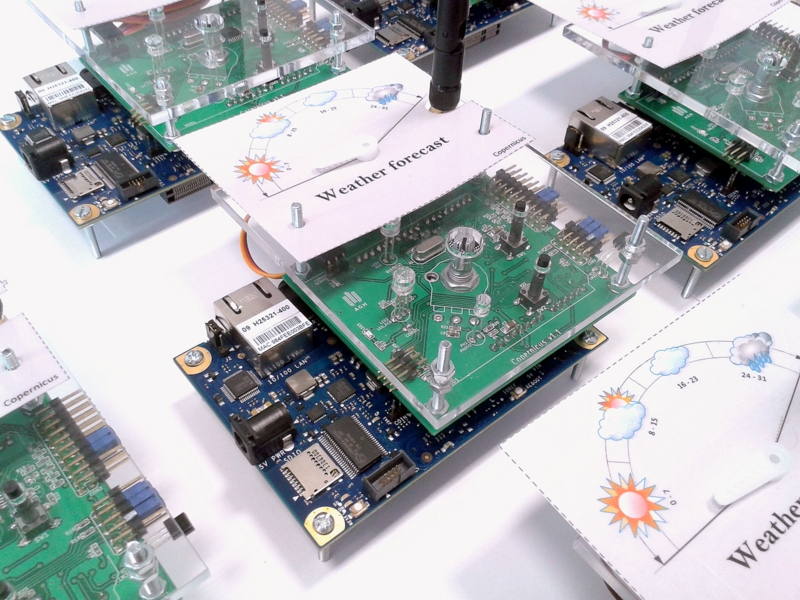
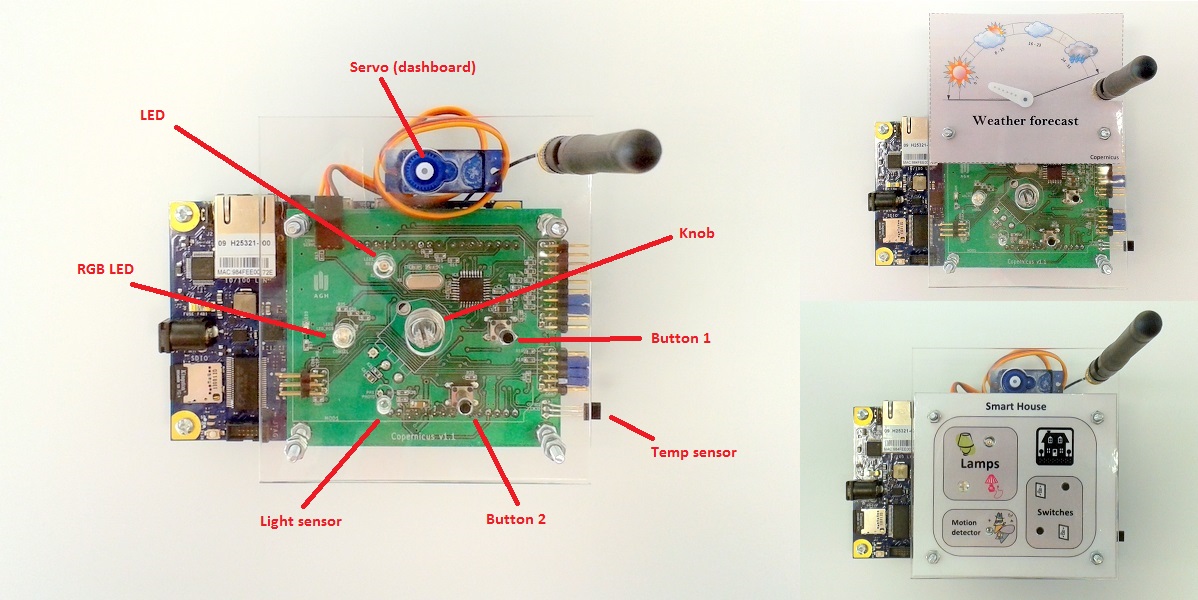
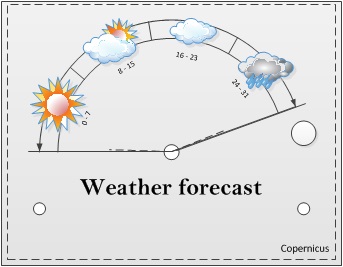
Copernicus is the Arduino compatible board with several peripherals including buttons, LEDs, light sensor, temperature sensor, knob and the servo. Scenarios are represented by sheets that can be attached to the Copernicus board as presented in the figure.
Hardware architecture
Copernicus is equipped with additional 8-bit AVR microcontroller. Together with the Intel Galileo board it constitutes the two processor architecture which seems to be the promising approach for IoT devices. Microcontroller is responsible for hardware interaction where real-time responsiveness is necessary, while the microprocessor on the main board may provide the application logic.Operation modes
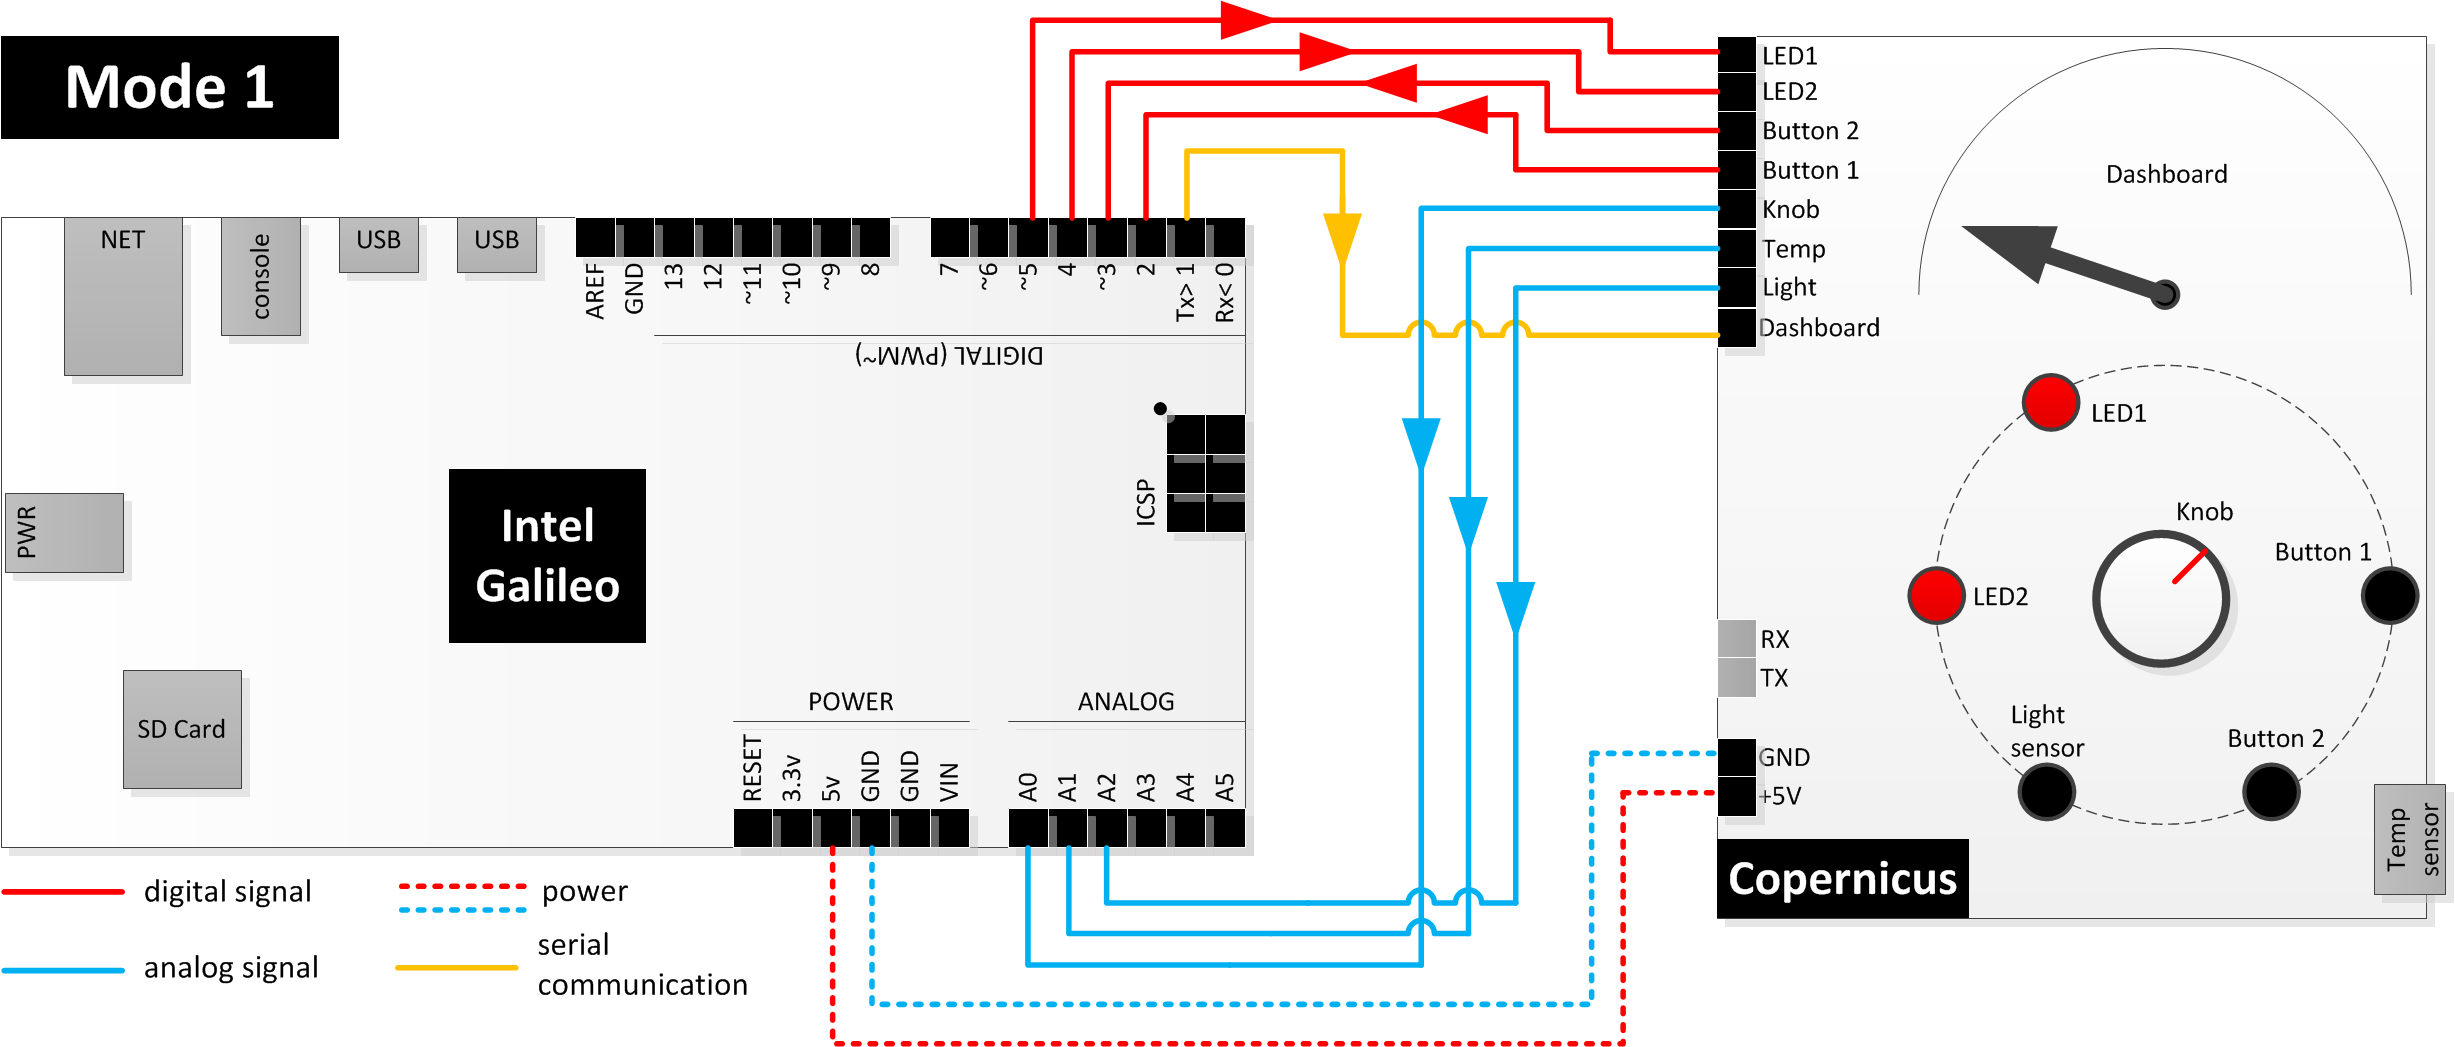
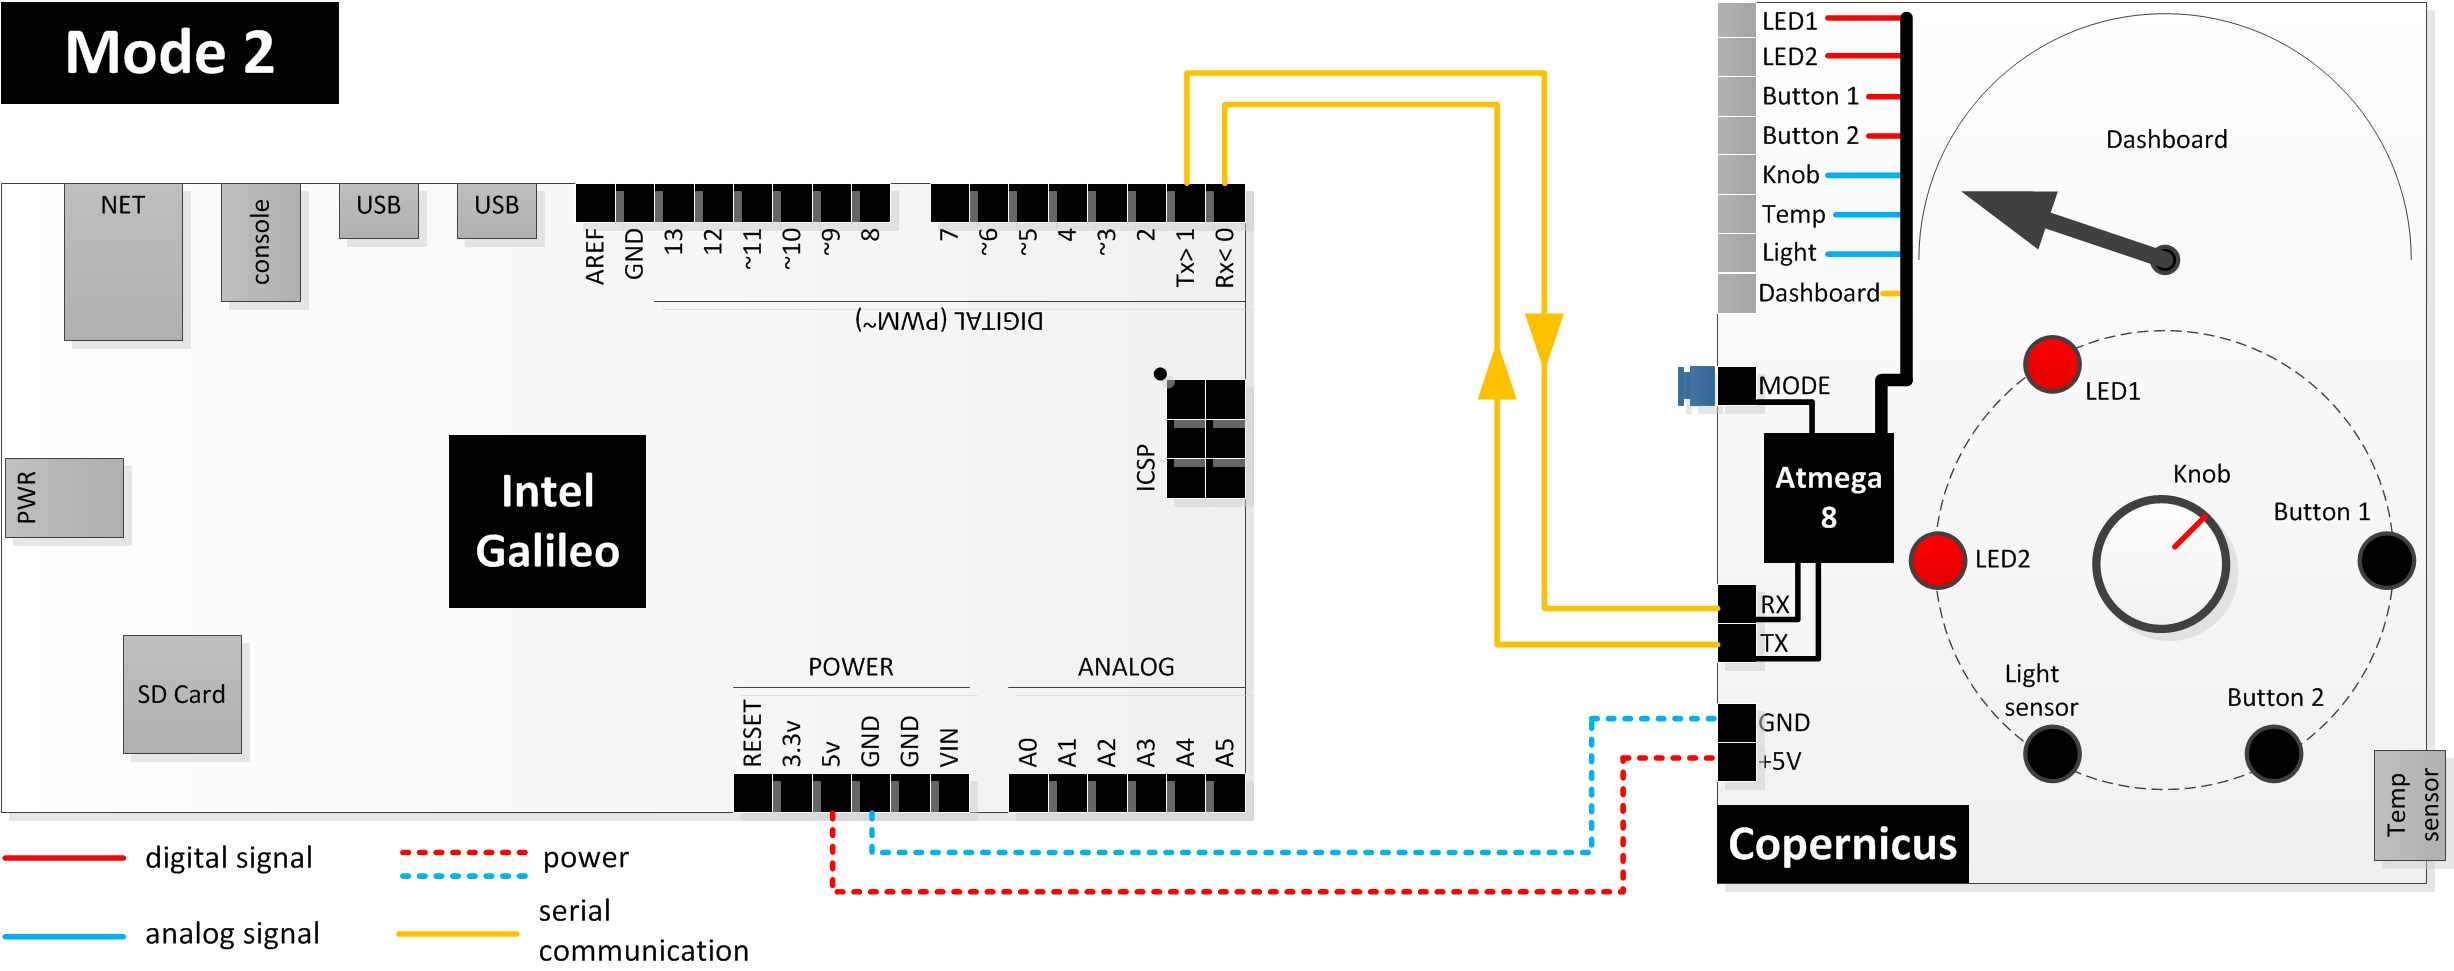
Copernicus can work in one of the two modes. The selection is done by the jumper.
- Mode 1 - Peripherals connected to the Copernicus board are transparently visible to the Intel Galileo. All the interactions are possible either from Arduino sketch deployed in the Galileo board or by dealing with files under Linux. Accessing GPIO is possible by active polling the state of the input pin which may consume CPU power.
- Mode 2 - Peripherals connected to the Copernicus board are managed by the external microcontroller and communication to the Intel Galileo is done using especially designed 1-byte serial protocol. This approach allows for using hardware peripherals from any programming language if it can communicate via serial port. Accessing GPIO is possible by active polling state of the input or by passive waiting for an event to occur e.g. button pressed, knob rotated by 10% etc.
| Mode 1 | Mode 2 |
 |
 |
Below are presented examples of simple application that turns on the LED whenever button is pressed.
| Mode 1 | Mode 2 | ||||
|
|
||||
| CPU usage is high and it is a tradeoff between responsivenes and CPU consumption. In this mode, device actively query the state of the button consuming the CPU cycles. | CPU usage is low because of the event-driven approach. |
1-byte protocol (Mode 2)
To simplify the interaction with external hardware peripherals, it has been decided to leverage the two-processor design of the device (first CPU in Intel Galileo, second CPU in Copernicus) introducing the communication protocol between the boards.
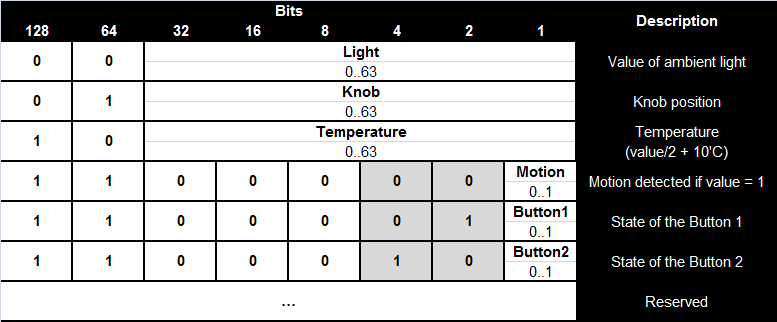
Implementing the communication protocol might not be a trivial task especially when there is need to deal with frame format, start/stop fields and other low level operations. Because of that, simple 1-byte protocol has been designed. Intel Galileo sends Query and receives Response. It is also possible for Galileo to assign for automatic updates of Copernicus peripherals. In that case, Copernicus sends to the Galileo Response whenever change occurs.
| Query | Response |
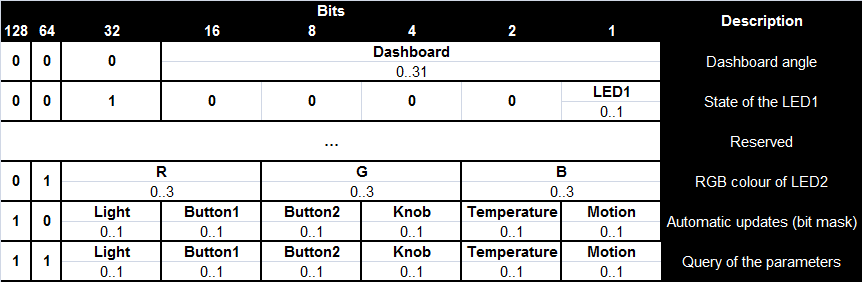 |
 |
Automatic updates (Mode 2)
For each Copernicus peripheral, the notification events has been defined:- Button1 - event is generated when button is pressed or released
- Button2 - event is generated when button is pressed or released
- Knob - event is generated when the knob reaches min or max position and when there is rotate of at least 10%
- Temperature - event is generated when temperature changes of 1'C
- Light - event is generated when the ambient light value changes of 10%
- Motion - detection is based on light value analysis i.e. long and short term moving averages are compared and when the difference is bigger than sensitivity factor event is generated
Lab organization
During a course students works in a group. Each group consists of three students having three desktop computers and two Intel Galileo boards with Copernicus boards. Third student usually implements server side of the system. Nevertheless, they solve problems as a whole group. Such an organization improves their team working skills and speedup the development process. Each lab takes 90 minutes long.
All the desktop computers and Intel Galileo boards are connected to the same LAN network. Boards receive IP addresses from DHCP pool. Each Galileo board has assigned static lease in DHCP pool, so students can interact with the boards using SSH. Labs for students are focused on interaction between devices and processing near the devices.
- Orientation lab
- No scenario sheet
- Students write simple applications playing with hardware on the Copernicus board. They might compare different ways of interacting with external hardware (Copernicus in Mode1 and Mode2) and discuss their pros and cons.
- Smart IoT devices connected to the Network
- Weather Forecast scenario sheet
- During the lab, students implement Weather Forecasting Device using Internet weather portals. They are encouraged to develop new device with their own scenario sheet for other parameters (pressure, temperature, etc.).
- Smart home I
- Smart home scenario sheet
- During the lab students design the network communication protocol based on UDP datagrams to enable interactions between devices.
- Smart home II
- Smart home scenario sheet
- During the lab students implements CoAP services for light switches and lamps. They compare the pros and cons of architectures where light controller is located on a light switch, on a lamp or on a external computer.
- Smart home III
- Smart home scenario sheet
- During the lab, students implement simple framework for managing home appliances that uses MQTT protocol for communication.
- Smart office
- Smart office scenario sheet
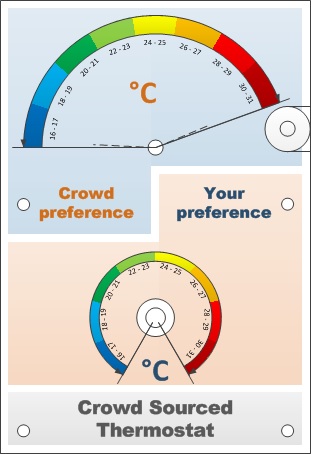
- Students develop the smart distributed thermostat. Such a thermostat is equipped with the knob by which users may set their preferences and the dashboard showing actual temperature that is the mean value of preferences from other thermostats. Students compare two approaches for interaction between devices - centralized mean calculation and distributed calculation based on the gossiping algorithms.
- Other ideas
- stream processing
- semantic web services
- energy-aware computation process migration
- data and computation offloading
First usage
Before using Copernicus it has to be calibrated:
- min and max position of the knob should be acquired to work properly in the Mode2
- servo should be calibrated to properly indicate the low and high position of the dashboard
- move the knob to the min and max position
- release one of the buttons
- set the min position of the servo by rotating the knob
- press button - led will blink once
- set the max position of the servo by rotating the knob
- press button - led will blink once
- release the buttons - led will blink twice
Files
- Schematic
- PCB layout
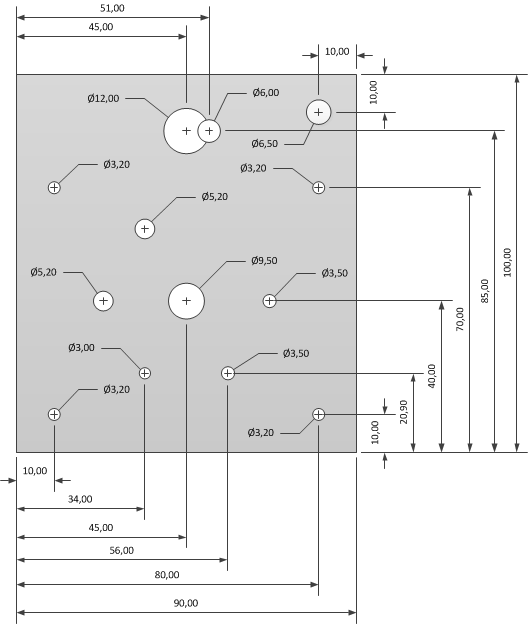
- Plexiglas dimensions
- Scenario Sheets
Authors
Tomasz Szydło tomasz.szydlo[at]agh.edu.pl
Robert Brzoza-Woch robert.brzoza[at]agh.edu.pl